Friday, December 21, 2012

Lego Disney Wonder Cruise Ship

The Lego Wonder


Recently, I built a model of the Disney Wonder, in Lego.  It's displayed at work, where I'm known for building Lego things, see "Shawn Dropped the Space Needle".  It's been displayed at BrickCon 2012 and is currently at work in Building 85.

There's also a YouTube video with my Lego at Lego Disney Wonder.  I've gotten a lot of questions, so here goes:

Lego Disney Wonder
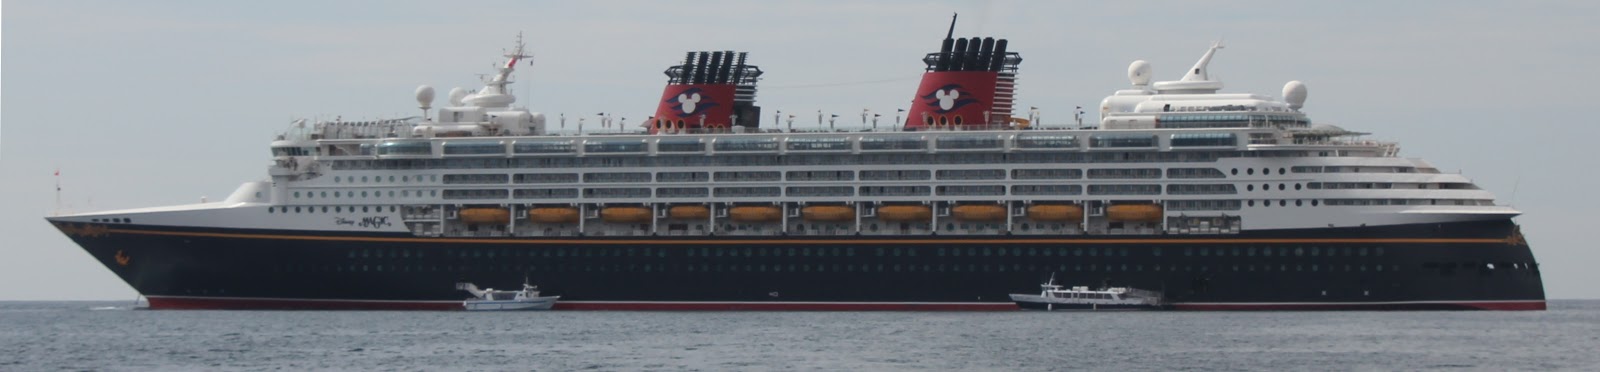
The Lego Wonder is as accurate as I could make it, which took about 4500 pieces.  The stats: it's about 4 feet / 1.2 meters long.  It took about 6 days (Lara says 60 hours) to build, as we were interrupted by shows on the ship, ports of call, etc.  As there are few Lego stores in the middle of the Pacific Ocean, we spent a couple weeks planning before the trip.

It Just Happened One Day

Rough mockup of Lego Disney Wonder
Prototyping
I blame it all on my wife, Lara.  We were planning on a cruise (one guess which ship), and she pointed out that on long cruises they sometimes have boat building contests.  She also mentioned that the judges might like to see their own ship, and, besides, it's a pretty ship.

With that conversation in mind, a few weeks before the cruise I noticed that our Lego store had a sale, and so I grabbed some bulk bricks. 

Of course when I got home and tried to do some research, and discovered that all my guesses were all wrong.  (I usually underestimate how many pieces I'll need for these things).  In the store there were 1x3 yellow bricks that I thought might work for life boats.  I also guessed that 16 studs wide would be about wide enough for the detail, and figured it'd be maybe 2 or 3 feet long.  Once I got the dimensions of the real ship I found how long and skinny cruise ships really are.  

My width, and the structure of the balconies also sort of forced the scale.  If I wanted it 16 studs wide and ledges for the balconies, then it was going to have to be 150 or so studs long....

All Those Little Details

Lego Wonder lifeboat prototyping
Figuring out Lifeboats
My 3-stud lifeboats weren't going to fit at that scale.  But the store didn't have any bricks the right color, so I was going to have to order bricks online, and we only had a couple of weeks before we left on the cruise.  I browsed through parts lists and came up with a few different ideas, but I wouldn't really know what worked for sure until I had the bricks in hand to play with, so I ordered parts for several different ways of building each lifeboat.  Enough for 10 lifeboats on each side.  I tried a few things at home, but crossed my fingers that the parts would work when they came.  That went for the parts for several other details as well.  The stacks for example, I only had a vague idea about, and so I tried to find a few different options that might work.

My biggest problem is that I remembered the hull being blue, but that didn't work in the rough mockup of part of the hull.  I went back to the store and got black, which worked a lot better (the hull looks black in a lot of photos of the real ship), but I still wanted better.  Unfortunately the right color was very rare and difficult to find. 

I managed to order some at the last minute, but it didn't seem like it would arrive in time.  I gathered some black just in case.  On the last day before we left I checked the mailbox, not really expecting anything.  There were some letters, so the mail had come, but no bricks :(  Not terribly surprised that they hadn't come, I walked up to the door, and there was a small package.  The missing bricks had arrived!

Ironically, later, on the ship, after that work on the colors, one of the other guests asked why it wasn't black, and I had to point out that the real ship wasn't black!

Index

Like, What Do You Mean There Aren't Any Instructions

(Back to Page 1)

Like, what do you mean, there aren't any instructions?  


People want to know how I can make a model without any instructions?  Honestly I'm a tad confused by the question because, like even "real" Lego models someone had to invent the instructions.  And Lego prides itself on the fact that millions of kids happily build tons of creative stuff from its bricks!

But it is a bit tricky to make a replica of a real thing.  There are lots of different techniques people use building Lego.  Some just have an idea and put a bunch of bricks together. Others get a 3D scan or file somehow and then write a computer program to tell them where to put bricks so that they fit in that 3D model (I guess that gives you instructions of a sort).  Others use some of the Lego software to build it on a computer, and then get the bricks needed to build that model.

In my case, I have a bunch of pictures that I took of the Disney Magic, (we've been on the Magic before,) and also I used Bing to hunt online for angles that I didn't have photos for.  During that process I learned that there're some differences between the Magic and the Wonder, some of which I wasn't very familiar with. So I had to guess what parts I might need.

How Big?

Getting the dimensions accurate was something of a challenge.  Bing helped me find out how long the real boat is (Length: 964 ft (294 m), Beam: 106 ft (32 m), Draft: 25.3 ft (7.7 m)).  That and a little math helped me figure out if I wanted 16 studs wide how long she'd have to be.  For the height, I measured the visible height and length on my photo and used that as a ratio to figure the model's height.  I also have a photo of the cut-away model in Port Canaveral, but I discovered that depending on other models doesn't guarantee accuracy, there're some pretty inaccurate models and paintings out there :(.
 
Scale Plan of Lego Ship
Scale Plan of Ship
The best thing that Bing helped me find was deck plans, like what travel agents use to show people where their cabins are. 

Of course those weren't designed for accuracy, but I was able to stick them into Microsoft Publisher and align them all (travel agents had a different need, so the decks weren't all aligned or the same scale).  On top of that I drew a huge grid, with the major "frames" marked so I could tell where stuff goes.  Ships are also built with frames for major structural sections.  Later I found out that many of the frames I assigned aligned with the real frames on the ship.

With the frames marked, I labeled each of the spaces between them, color coding some so I wouldn't get "lost" going from the drawing to the model.  Each section was numbered, and I translated those numbers to the actual model.  (They had to be moved a few times to get the ship centered on the Lego plates).

Start with frame and grid method
Frames and Grid Method
In key areas, I also drew grids for each stud.  That allowed me to use something like "The Grid Method", which, in art, is a technique where you draw a grid on an picture.  In that method you copy each square of the grid to a new drawing using the grid as a reference, often changing scale as you draw the new copy.  Mine was something like a 3D grid method.

I also had to figure out how tall each deck really is, as each deck isn't the same height.

The grid also helped figure out where the pools and other details on the top deck went.

The Tiny Details

Even at my scale, lots of the details on the ship were too small to render in Lego.  I was conflicted a bit, but decided to create some stickers (in lieu of decals).  Lego does it in their kits, so I guess stickers are fair game.  Clearly I'd need those ahead of time, so I found pictures of the details, like the scrollwork on the bow and stern, and the ship's name on her side.  Since I had an idea of the scale, I could measure those on my photo to figure out what size they were, and then print them out.

It was a bit annoying to edit the images and get rid of whatever background stuff was there, but eventually I had some images that I could import into Publisher, picking a paper template for my labels, and then print them.  Some got printed on white labels, others on clear labels.

Time To Go

Eventually the parts came in the mail, got and got dumped into a big bag.  I printed several copies of the photos and the publisher diagrams.  Gathered the labels.  Copied the photos for my study and the publisher files onto my Windows 8 tablet.  Then it was time to get on the plane for California.

Index

Building the Lego Disney Wonder

(Back to Page 1)

Building the Lego Wonder

Day 1 of building the Lego Wonder
Lego Wonder Day 1
Turning around a cruise ship is an incredible task.  They dock early in the morning, and, after clearing customs, then they have to get a couple thousand people off the boat, somehow reunite them with their luggage, and get them out of their hair.  Then they have to get another couple thousand people (& their stuff) on the boat, and do it in time to leave.  (& that's ignoring all of the food, trash, fuel and other stuff that has to happen)  That this all happens smoothly for the most part is amazing.

So it's not terrible surprising that the incoming passengers like me aren't reunited with their luggage for some time, and that they are left to roam the ship as their cabins are readied.  Knowing this, we planned ahead.  Lara brought a book, the kids brought swimsuits, and I... carried onboard a big bag full of Lego.

Helpful Porter: "Don't you want to check those big bags sir?"
Me: "No, I'm fine, really, thanks, I'll carry them."
I immediately went up to the top deck and started building.


It Takes a Little Time


Day 2 of Building the Lego Wonder
Lego Wonder Day 2
There's a lot to do on a cruise ship, besides build Lego I mean, but we made steady progress.  Before we left, I had mocked up part of one side, in the wrong color, to make sure that some of the sizes were right, but I'd ignored the curve of the stern and the complex curves of the bow.  The hull at the bow has a "sharp" point at the bottom, by the waterline, but has a broader more gentle curve up top, so the angles of the bow change every deck.  That took time to get right.

Also the hull needed structural support near the stern (see the holes for the line handling.  On, I think, deck 4).  Also there needed to be something to hold the bow together since I built it upside down.

(By the way, people asked about the bulbous bow.  In my model its below water :)

Hold Your Horses

Building the Lego Wonder on Day 4
Lego Wonder Day 3
By now you might be wondering about those horses at the bow.  Bing told me that Disney Wonder has over 77,000 horsepower!!!!  (But I still haven't figured out where she puts them all!)

Actually, those were just because, when I was buying pieces, there were bulk horses on the wall and I couldn't resist :)

Daisy Duck examining the Lego Wonder on Day 4
Gawking at Lego Wonder on Day 4


Gawkers

As the days passed, the guests and staff became interested in what we were doing.  Lara & I got lots of praise for the ship.

Since it was a Disney ship, humans weren't the only ones that stopped to take a look.  Most of the gang did too, here's Daisy.

Index

Land Ho!

(Back to Page 1)


Land Ho!

Land Ho!

After several days at sea, we reached Hawaii.  That slowed down construction of the Lego Wonder because we had some islands to explore.


Where to put the Wonder?

Lego Wonder in Cabin, Day 6

People kept wondering where we put the Lego Wonder while we were working on her?  Like, surely we didn't leave her up on deck by the pools?  Did we?

Every day we picked her up and carried her down to our cabin (which freaked some people out).  This was one of those fortuitous things, since I didn't bother to measure the cabin's desk when I figured out how long she should be.  Like, cruise ship cabins aren't exactly known for their space you know!  And there's pretty much only one flat surface in the cabin - the desk.  The Lego Wonder cleared the walls with a couple inches to spare!


Um, What Do You Mean "Take it Home"?"

Captain Fabian with Lego Wonder, Day 10
There was another not-well thought out part of our plan.  About the 2nd day people started asking how we were going to get her home.  Umm.  Good question!  It wasn't exactly going to fit under our seat on the flight back.

We realized that the real Disney Wonder was going to Seattle in a few weeks and started hinting to the crew that maybe our Lego Wonder could stay on the Disney Wonder until Seattle.

I'd barely gotten the words out when this nice gentleman mentioned that he had the perfect spot in his cabin :)

Oops

We didn't spend a lot of time with Lego while in Hawaii, but we did encounter a few problems with the stickers and pieces.

Remember those 10 life boats per side that I bought exactly the right number of pieces for?  Well, sometimes I found "other" places to use those parts, but since I hadn't bought extras, I couldn't use them.  Also, when I dropped one I had to hunt around and find it, because there wasn't a spare!  We did find a Lego store in the middle of the Pacific - in Honolulu, and we bought some extra parts for spares.  (No, we didn't spend all day in the Lego store, it was unscheduled time, we aren't THAT crazy!)

Another problem was those stickers.  The clear stickers worked great for the ship's name on the white bricks, and the white stickers were fine for the rectangular pools.  However, knowing that the hull wasn't white, for the yellow scrollwork on the bow and stern I'd printed clear stickers.  They looked great on the sticker sheet, but the translucent yellow on the dark blue hull was nearly invisible.  Also I'd totally goofed on the logo on the stacks, both with the size and colors, so, in our first port, we stopped and bought a printer.  (Hey, it was on sale at least!).

All in the Details

Goofy in Lego Wonder, Day 12
The rest of the time was pretty much working on the little details around the top.  Some parts were reworked a little, either for structure or because something was more obviously "off" once more of the ship was built.

The top was way harder than the hull because the hull was big and mostly regular.  The top has lots of little details like the pools, stacks, masts, etc.  Now that we had a printer, I was able to put little figures on the ship, Mickey on the bridge and Goofy working ropes in the stern.  Unfortunately that meant ripping off the bottom of the boat to stick goofy in.

I also learned interesting things about the ship, like the front stack is shorter than the aft stack, which I didn't notice until I was trying to figure out the stack.  The picture I had of the back stack I had was partially occluded, so I looked at the photo for the front stack and went "whoa, it's not the same!". 

Good thing I caught that because Captain Fabian looked for that detail when he stopped by!

Factoids About the Ship

The front stack is a fake, to help get the modern-classic ship look Disney wanted.  Captain Fabian explained that the reason for the shorter front stack is so that the aerodynamics of the ship allow the exhaust from the real rear stack to escape above the turbulent layer around the ship.  Wind tunnel tests during planning for the Disney Magic and the Disney Wonder had showed that with the front stack higher, the exhaust would get trapped and sucked back down into the passenger areas on the stern.  He was thrilled that I got the heights right, particularly since there are paintings hanging on his ship that missed that detail :)

Along the same lines, classic ships (think Titanic) had lifeboats up on the top deck, not in the middle like a modern cruise ship.  I learned that the curved bay viewing windows on deck 9 represent those life boats, each being positioned directly above a real life boat.  And 2 are shorter "speed boats".

I also ran around the ship looking at everything and taking pictures, trying to get the dimensions right.  For example, I counted the windows down behind the life boats and marked their positions on the diagrams in my notes.  That's when I learned (rather obviously in hindsight) that there's no lifeboat 13 (or 14, so that odd and even numbered boats are all on the same sides).

Index


All Done With the Lego Wonder

(Back to Page 1)

The Vaʻa Contest


Juding the Vaʻa Contest, Day 12
Judging the Vaʻa Contest
Remember we thought there'd be a boat building contest?  Well, sure enough, Goofy & Max held a vaʻa contest.  Vaʻa is a Hawaiian word meaning canoe or boat, and there were lots of excellent boats there, many very creative, and most with a much more Hawaiian theme than we had.

We also didn't float, which was a bit of a hindrance.  The previous day I had tried to measure the displacement of the ship to figure out how to get her to float.  The scales were forward on deck 9, and going there the Lego Wonder was blown almost out of my hands, the bow crashing to the deck.

Instead I prepared a Stunt Double (This is a Disney cruise after all) Lego outrigger, but it leaked and got swamped, though it didn't sink.   (Lego doesn't really tend to sink).

Despite being the only boat not to float, and the fact that the rest of the entries floated for the entire required time, we were given an Honorable Mention, which was terrific.  There were tons of great entries and the judges really had to struggle to choose between them.  Personally I liked some of the vaʻa made from tea leaves and others, very creative.  I'm glad I didn't have to judge!

Aftermath

Blind Person Looking at the Lego Wonder Model
Since half the people on the ship had seen us building the Lego Wonder on deck, everyone wanted to see it when it was done.  The officers found a place where everyone could take a look, and then later the Lego Wonder was taken down to the crew area so the crew could see it too.  I don't think I've ever had so many photos taken of one of my Lego creations.  Even Mickey and the gang took a look!

One particularly neat thing was that we had noticed another passenger who was blind.  We invited him to explore the Lego Disney Wonder.  What I hadn't realized is that there aren't a lot of touchable models of the ship, so this was I think the first time he was able to get an idea of the shape of the ship.  There were parts he hadn't had a chance to observe before, like all the communication domes and masts on top of the hull.

Coming Home

The Gang with The Lego Wonder
Lego Wonder and The Gang
We did leave without the Lego Disney Wonder, but she showed up a couple weeks later in Seattle.  Our first attempt to collect her ran into customs issues, but now she's back after a detour through Alaska!
Our thanks to Captain Fabian, and the crew, and staff of the Disney Wonder for helping to bring her back.  We have no clue how it would've worked on the airplane!  Thanks!

Index

Shawn Dropped the Space Needle


I Dropped the (Lego) Space Needle


Around work I'm well known for the Lego bricks in my office (counting in the 10's of thousands of pieces).  Last summer I was tricked into building a Lego Space Needle for a space in our old building. 

As you can see, I dropped the space needle when moving it to the stairwell in our building.  It’s about 4250 pieces (+ 1 minifig if you can find it).  I dropped it around noon, before x-mas, took it home, and it was repaired by that night :)

After repairing it was even better (I didn’t like some of the top, and parts were made a bit stronger).  There’s no glue, except for a dab on the spire.  I started it last summer.


More recently I've built a Lego Disney Wonder.